School is starting, and it’s time to get back into a routine. While Genny is only turning 3 this Fall, many of her little friends are going back to school, and she’s been talking about it, too. We’ve had a very laid back summer without much of a schedule, and I think all of us are looking forward to the consistency that the school year brings, even if she isn’t going to school. I also want Genny to get used to the responsibility of “school”. I’m working on a preschool schedule for her that will include calendar, daily chores, activity boxes, and other educational games and toys. For now, here are 10 back to school activity boxes for preschoolers that cost hardly anything and that you can add to your arsenal of toddler/preschool activities!
(See my newest post on activity boxes – 5 Engaging Activity Boxes for Preschoolers)
Two reasons you need to use activity boxes
#1. Mommyhood is hectic, no matter what. Whether your preschooler is staying home with you every day, goes to mother’s day out a couple days a week, or spends time between daycare and Grandma’s house, there are moments when mom just needs a break. These boxes are structured, educational, and easy to grab and start using.
#2. These ready-to-go boxes of activities provide consistency, order, and teach responsibility to your little one. Public school classrooms use the same concept when doing “stations”. Also, bonus 3rd reason, they are super cheap to make, and if you stock up about 20 of them (I store mine in large plastic bags in the closet), then you can switch them out every couple of weeks to provide some variety.
Activity boxes for each day
Genny gets so excited every day when it’s time to do a box. Even if she’s not crazy about the activity itself, she likes knowing what comes next in her day. If you know me at all, you know I’m not a very schedule-oriented person. But with kiddo #2 on the way, I’m trying to become more-so for my own future piece of mind.
I created two different types of boxes for Genny, based on necessity. In my first trimester, I was so tired and sick that I wanted something for her to be able to do besides watch TV if I wasn’t feeling good. Thus, the Blue Box and the Morning Box were born!
Morning Boxes
These types of boxes are, obviously, to be used in the morning. Each one simply has a “Morning” label on it, and Genny is allowed to choose whichever one she wants to use. As with all the boxes, the minimum time for each box is 15 minutes, and she must clean it all up before she can move onto something else.
After putting the boxes together, I showed her how to do each one. The activities were planned so that she can complete the tasks alone, but of course some times she wants me to play with her, and sometimes I do.
Morning Boxes contain specific tasks that must be carried out in order to sharpen a certain skill. For instance, the sticker sort box develops color matching and sorting skills. In the morning, after she has eaten breakfast and done her “chores”, she can choose a Morning Box to complete. I will set a timer, and she knows she has to continue working on it until the timer goes off. It’s a great way to start off the day!
Blue Boxes
These boxes I usually have her do in the afternoon after lunchtime. Each Blue Box contains a different sensory activity or fine-motors task. The difference between these and Morning Boxes is that Blue Boxes do not have a set of steps to complete. While some have the option of being more structured, overall they are more free play. For instance, the rice and measuring spoons and cups box has no specific end goal, rather the materials are there for her to play with, to feel the rice, to scoop and pour, and to familiarize herself with different types of measuring utensils.
The recipe for a box
I’m no genius, these boxes are very easy to create yourself. The key is to start off with where your child is developmentally, then choose a task that is challenging enough to be interesting but not so hard that it becomes frustrating.
You don’t have to look far to find materials your little one would like to play with. It can be as simple as tearing sheets of paper into smaller pieces and using a glue-stick to adhere them to another piece of paper. If you’ve ever seen a toddler play with an empty cardboard box, you know this to be true!
10 Back to School Boxes for Preschoolers
As with my first post on activity boxes, all of the materials listed here were purchased at Dollar Tree or found around my house.
Morning Boxes – Skill focused
1. Eraser Matching
Skills:
-Sorting, shape recognition

Total cost: $2.12
You’ll need:
- Permanent marker + pencil
- Piece of paper
- Fun-shaped erasers – $1
- Shoe-size plastic storage container – $1
- Laminator (optional)
- 1 Laminating sheet (optional) – $0.12 per sheet
How to make: Trace the outline of each eraser on a piece of paper then go over the lines again with a Sharpee. You can then laminate the page (I also trimmed it down), and voila! You’re done! Toss it all in the box.
Adaptions: You can do this activity over and over again with different types of erasers. This is the second box like this I have made, but because she had done a similar one before the task wasn’t difficult to learn AND she found it fun that it was different.
Procedure:
- Match each eraser to the outline where it best fits.
2. Sticker Sort
Skills:
-Sorting, matching

Total cost: $2.12
You’ll need:
- Permanent marker + ruler
- Piece of paper
- Stickers of varying colors/shapes – $1
- Shoe-size plastic storage container – $1
- Laminator (optional)
- 1 Laminating sheet (optional) – $0.12 per sheet
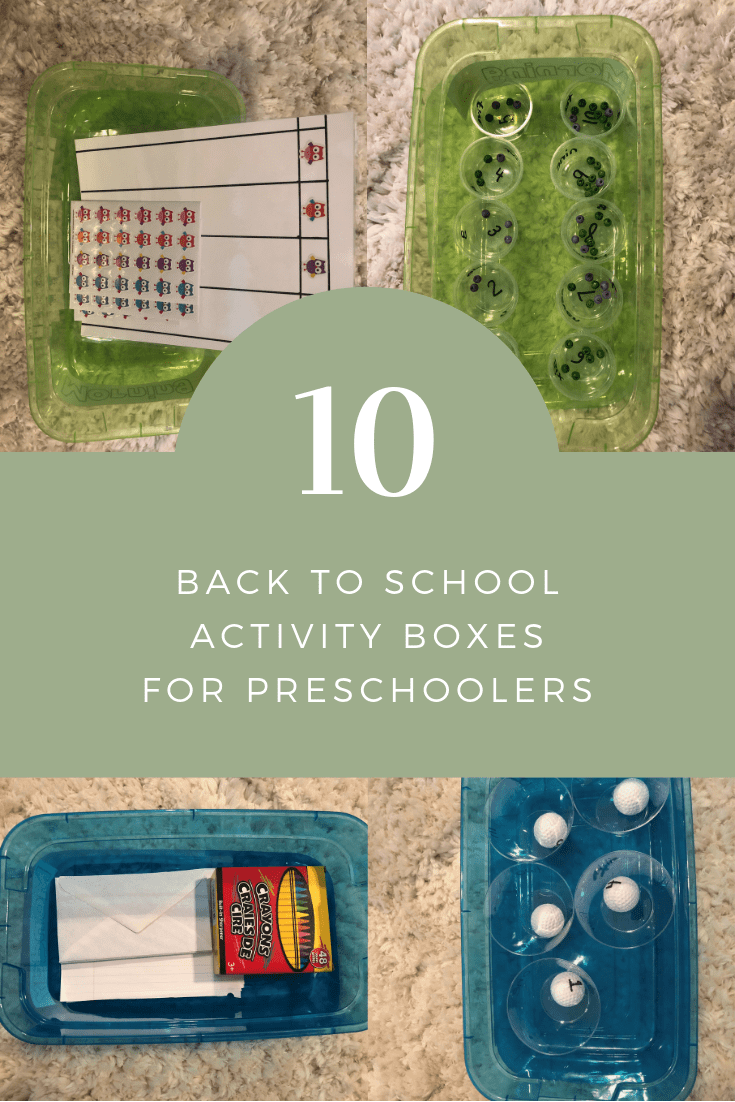
How to make: Using the ruler and marker, divide the page into the same number of columns as different sticker types. For instance, the owl stickers came in four colors, so I created four columns. At the top of each column, place a different kind of sticker. Laminate, and go!
Adaptions: Like the erasers activity, you can recreate this with any kind of sticker. You can see the other Sticker Sort box I made in my last post.
Procedure:
- Place each sticker in the column that matches.
3. Bead Count
Skills:
-One-to-one correspondence, numerical value, counting

Total cost: $2.00
You’ll need:
- Permanent marker + tape (optional)
- Beads
- Small plastic containers (5-10) – $1
- Shoe-size plastic storage container – $1
How to make: Using the Sharpee, number each cup consecutively (I also wrote the number out) on the side and on the bottom. Place enough beads in the box so that each cup will contain the correct number of beads (1 bead for the 1 cup, 2 beads for the 2 cup, etc.). Place all materials in the box.
Adaptions: Use more or less numbers depending on the child’s level.
Procedure:
- Count the correct number of beads and place them in each cup.
4. Animal Match
Skills:
-Animal names, animal recognition, matching, animal families

Total cost: $2.00-3.00
You’ll need:
- Animal cards – $1-2 (Mine were from a box of Highlights activities that I got on clearance, so it was technically less than $1 – Any animal cards will do. If you can’t find any with the mama and baby animals to match, then just get two of the same kind of cards)
- Shoe-size plastic storage container – $1
How to make: Place cards in box.
Adaptions: Any animal cards will do. If you can’t find any with the mama and baby animals to match, then just get two of the same kind of cards
Procedure:
- Match each baby animal with its mama.
5. Dinosaur Sort
Skills:
-Sorting, color matching

Total cost: $3.00
You’ll need:
- Markers (colors to match plastic animals)
- Piece of paper + tape
- Dinosaurs (or other plastic animal) of 3 different colors – $1
- Three small baskets – $1
- Shoe-size plastic storage container – $1
How to make: Cut 3 small squares of paper and scribble one color on each. Tape it to a basket. Place everything in the box.
Adaptions: Any type of small plastic animal is good, so long as they are three different colors. You could also sort by type, then you would need to label each basket with a sketch (ha, I’m not doing that!) or a print-out of the animal. You could also print an image of the real animal and have the child sort that way.
Procedure:
- Sort the dinosaurs according to color into the baskets.
Blue Boxes – Sensory-focused
6. Rice Measuring

Total cost: $2.00-3.00
You’ll need:
- Measuring cups and spoons – $1-2
- Bag of rice
- Other cups or bowls (optional)
- Shoe-size plastic storage container – $1
How to make: Place everything in the box.
Adaptions: My goal is to work up to her doing “recipes”, so you could make little recipe cards for some more advanced learners.
Procedure:
- Measure and pour the rice without letting any rice leave the box.
7. Ruler Drawing

Total cost: $2.00
You’ll need:
- Pencils
- Paper
- Ruler – $1
- Shoe-size plastic storage container – $1
How to make: Put all materials in the box.
Adaptions: You can use markers or crayons instead if you prefer.
Procedure:
- Practice drawing straight lines using the ruler.
8. Golf Ball Drop

Total cost: $3.00
You’ll need:
- 5 plastic golf balls – $1
- 5 small plastic cups – $1
- Permanent marker + tape
- Shoe-size plastic storage container – $1
How to make: Label the golf balls and the cups 1-5. Cover with tape to prevent smearing. Place balls and cups in the box.
Adaptions: Use more or less numbers depending on the student. You can also write the number word, the die equivalent, and the tick mark equivalent on each cup.
Procedure:
- Sort the golf balls into the correct cup.
9. Letter Writing

Total cost: $2.00
You’ll need:
- Box of crayons – $1
- Envelopes
- Small squares of lined notebook paper
- Shoe-size plastic storage container – $1
How to make: Put materials into the box.
Adaptions: I will provide stamps and show her how to address the envelopes when she’s done.
Procedure:
- Write and draw on the papers, place in the envelope, and mail to a friend or family member.
10. Bead Patterns

Total cost: <$1.50
You’ll need:
- Beads of varying colors
- Pipe cleaners
- Container to hold beads (optional)
- Shoe-size plastic storage container – $1
How to make: Cut pipe cleaners into three-inch strips. Create a simple pattern with the beads on each pipe cleaner. Do not use all the beads. Place all materials in the box.
Adaptions: Start with simple AB patterns then move to more difficult ones. If the child doesn’t do patterns for long but instead just strings beads on the pipe cleaner, that’s fine too. The goal is to build fine motor skills, not to practice patterns necessarily.
Procedure:
- Repeat the patterns using beads OR string beads onto pipe cleaners.
What is your preschooler’s favorite activity? Share with me by commenting below!
Love, Emily XOXO


What People Are Saying